- Portfolio ▼
- | Blog
- | Affiliate discounts
- | Guestbook
- | Info
- | Contact
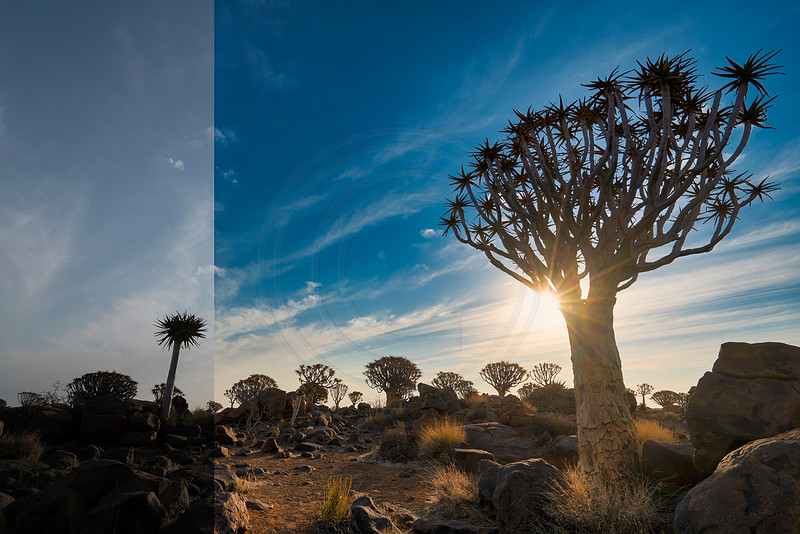
Post-ProcessingLet's face it if you want to be a good photographer you have to be a good post-processor. This does not mean that you have to master PhotoShop. There are other tools available, but you have to choose your tools and use them well. Serious photographers shoot raw. JPGs are 8-bit files and they show terribly once you start pushing too far in post-processing. Raw files become 16-bit files which hold up much better when they are pushed. You may ask, "why push your files?" The best images, for landscapes anyway, are to be had in low light conditions. They are taken in difficult to shoot light. Your camera does its best but the image always looks disappointing when you open them up on the computer. All raw images need post-processing to look good. They need to be sharpened and tweaked. What makes matters worse is that we often shoot straight into the sun. Your camera's sensor has a difficult time to handle that - yet it does a beautiful job if you know your post-processing. Enough said ... let's look at an image to explain what I am talking about:
The left dark side of the image is how my camera's sensor saw this image. If you do not know your post-processing you may be tempted to through this image away. You may even want to scold your camera and think about dropping photography because what you saw was something similar to the right side of the image. Why then does your camera capture what is on the left if it looked like the right? Well, you are shooting right into the sun, which is very bright. So your camera thinks that it is too bright and darkens the image like on the left. Now you will tell me that as the photographer I should be shooting in manual and that I should take control and set the camera to take the image to look like on the right. Let me call your bluff! I challenge you to go and take this or a similar image to look like the right with just one image (no HDR or blending). It is not possible. I was in control of my camera and I deliberately shot the image to come out like on the left. Why? Because the sun is too bright; if you give the image more light you will blow the sun. Sure the left side will look nice but where the sun is will simply be a white blob of nothing. In situations like this, you deliberately expose for the sun so as not to blow/clip it. However, that will leave your image looking like on the left. You just don't have any other choice if you want to capture this image in just one exposure. If the image then has to look like the left how on earth did you get it to look like on the right? I am glad you asked. What if I told you that I post-processed this image in less than one minute taking it from how it looked on the left to how it looks on the right? You may not believe me but here is what I did:
Done! Since you are working with sliders it is all very quick. You don't need to learn fancy techniques and complicated steps. Your image is ready. I do one more thing in Camera Raw before number 11. I use a brush to dodge and burn (make lighter and brighter locally - only certain spots) but this is also a quick and easy few seconds. I have to say, I really like the Luminar software. The new AI Sky Enhancer does a really good job. It picks up the sky through the quiver tree's branches automatically. My post-processing time has been cut dramatically by using this software and I love the results. Give the software a try. You can get a discount if you buy the software through this link: https://macphun.evyy.net/c/404711/320119/3255 Full Disclosure: I am an affiliate of Skylum Software, the makers of the Lunimar Software. I get a small kickback if you buy the software through my link. However, I personally use the software on every image and love it. I am not telling you about the software to make a penny. This is my software of choice. Comments
No comments posted.
Loading...
|
Subscribe
RSS
Archive
January
February
March
April
May
June
July
August
September
October
November
December
|