- Portfolio ▼
- | Blog
- | Affiliate discounts
- | Guestbook
- | Info
- | Contact
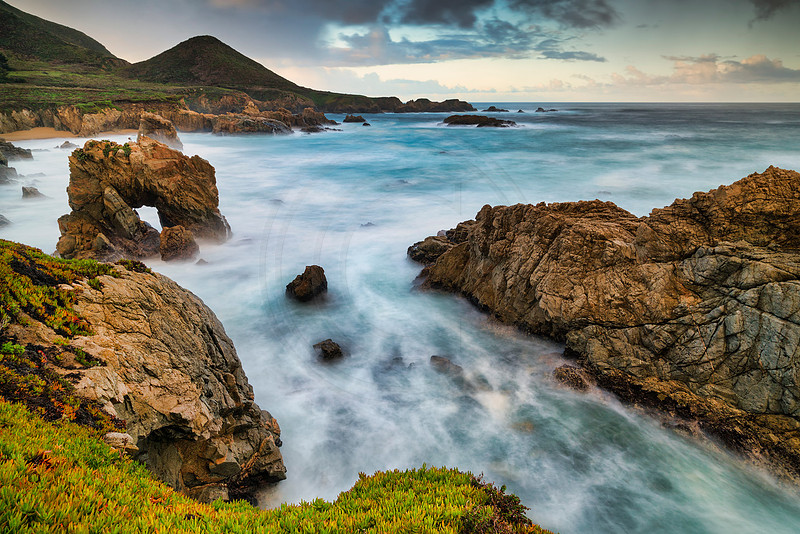
Neutral Density FiltersOn a recent workshop I co-instructed with famed photographer Don Smith. I was trying out a new system for handling neutral density filters. Midway through the workshop quite a few participants asked about this system and why I was using it. I had to explain to them what I was doing and why. For you I can just show the result:
I can show you the images I took of this scene without the filter but I am just going to explain it. A neutral density filter does not change the color of the image (if it is a good one, cheap ones tend to have color casts). It simply let's less light through to the lens. This allows you to use slower shutter speeds. In this case my ISO was already low and my f-stop was already at sixteen, yet my shutter speed was too fast to show the motion I wanted. A neutral density filter allows me to get lower shutter speeds. The shutter speed in this case created some movement. The water is flowing into the scene which makes the viewer's eyes do the same. It also creates the dreamy, mystical, cloudy effect you see. This image is just so much better than the images taken without the filter. It is more artistic. Here are a few things to consider when you buy such a filter system and of course the filters themselves:
You may want to know which filters I suggest. Firstly, let me state that I am not affiliated with nor do I profit in any way from making these recommendations. I make these recommendations purely based on my experience. In my opinion the best filter holder system comes from Wine Country Camera. Be warned, I almost needed heart medication when I looked at the price. However, this system is built like a tank and well thought through. I also highly recommend their filters. Another company whose filters I really like and use is Break Through Photography (out of San Francisco). I use some of their filters on my Wine Country Camera system. I used to use screw in neutral density filters, but I will never use them again. Sure they have no light leak issues or outside rear reflection issues. But they are a pain to use. I often also use a polarizing filter with my neutral density filters. The screw in filters make it too dark to compose, focus and tune the polarizing filter. Now you can compose before screwing the neutral density filter on, but I have found that when I do I tend to touch the focus ring and my polarizing filter also gets rotated as the neutral density filters rotate in. Then I want to recompose for another image but cannot because I cannot see well - it is too dark. Now you have to remove the neutral density filter, start over and put it back on when ready. The Wine Country Camera System just does not work that way. You just slide them in and out in one second. I truly love this system. They could make it lighter as it is heavy. The price has much room for improvement. In my opinion it is still the best system out there. The glass filters from these two companies are just awesome. Although I am not going to talk about these filters in the upcoming posts, many of the images that you will see where taken with these filters on. I plan to briefly explain the benefits with each image. Comments
No comments posted.
Loading...
|
Subscribe
RSS
Archive
January
February
March
April
May
June
July
August
September
October
November
December
|