Creating Massive Panoramas

February 12, 2017  •  Leave a Comment

There are two kinds of panoramas. Firstly, there is the obvious panorama that used a long ratio (very long compared to wide). Secondly, there are panoramas that are the same ratio as single shot images but that are still made up of many images to gain resolution. The point of these files is to be able to print them VERY large. But how do you go about shooting panoramic images?

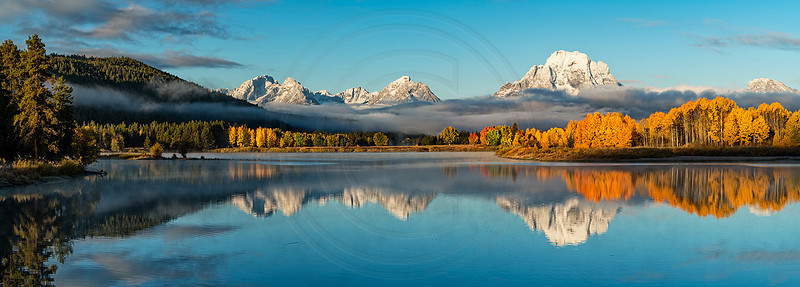
          Once upon a time, people used to invest a lot of money to get the equipment to do panoramas properly. Purist will still argue that it is necessary to get the best result. I guess they may be right, however, with today's software I am getting incredible results with no special equipment. Before I share some tips on how to do this, let's look at an example:

This is a massive file which can be printed very, VERY large. I cannot remember how many images make up this final shot. One limitation to making panoramic images without specialized equipment is that your narrow side will be limited to your camera's resolution because you really need the equipment to shoot multi-row panoramas. If you are satisfied with a limited narrow side, go for it without fancy equipment. Here is what I do:

  1. Shoot vertically. This will increase your resolution on the narrow side from the default narrow resolution of your camera to the horizontal resolution of your camera.

  2. Use a tripod.

  3. Get it as level as you can. If it is not level you will have to crop out valuable resolution. Yes, I know that PhotoShop has a new feature to fill the empty sections rather than to crop it. If the areas that need filling are just sky or water, that is just fine. If it is rocks or contains lots of details you will rather want to get it right with a level tripod to minimize any content aware fill.

  4. Make sure to overlap a decent amount to give your software the best chance of doing a good job.

  5. Make sure that you expose the sequence of images the same; use manual mode.

  6. Make sure that both white balance and tint is set the same for each image in your raw processor.

  7. Load all the images into your raw processor simultaneously (I use PhotoShop). Make your minimal adjustments to each file (I really do very little here as I will work on the DNG file (which PhotoShop will generate) in the raw processor again once the files are merged.

  8. Now select them all (click on the first one, in the film strip to your left), then hold down the "shift" key and click on the last image. Now right click and go to merge.

PhotoShop will now do its magic and spit out a DNG file which you can pull into the raw module to start your processing. Enjoy shooting some panoramas, it really is not difficult.


Comments

No comments posted.
Loading...
Subscribe
RSS
Archive
January February March April (3) May (5) June (4) July (5) August (4) September (2) October November December
January (4) February (4) March (5) April (3) May (4) June (2) July August September October November December
January February March April May June July August September October November December